iRobot Roomba’s automated cleaning power has revolutionized home maintenance. However, encountering an error can disrupt your cleaning schedule. One common issue is Roomba Error 14, which signals a problem with the bin or filter. This guide will walk you through understanding, troubleshooting, and fixing Error 14 to ensure your Roomba operates efficiently.
Table of Contents
Understanding Roomba Error 14
Error 14 Explanation: Roomba Error 14 occurs when the robot cannot detect the bin. This error is usually due to the bin not being installed properly, the filter missing, or the bin detect switch issues.
Common Causes:
- Improper installation of the dustbin.
- Missing or improperly placed filter.
- Faulty bin detects switch.
Step-by-Step Troubleshooting
Checking the Filter
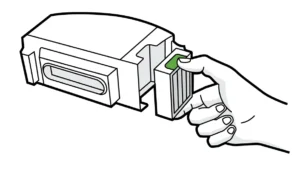
- Locate the Filter: Open the bin to find the filter compartment.
- Remove the Filter: Take out the filter and inspect it for any debris or damage.
- Clean or Replace the Filter: Tap the filter gently to remove dust, or replace it if it’s worn out.
- Reinstall the Filter: Ensure the filter is correctly positioned within the bin.
Reinstalling the Bin

- Power Off Your Roomba: Ensure your Roomba is powered off to prevent accidental activations.
- Remove the Bin: Press the bin release button and slide the bin out of the Roomba.
- Reinsert the Bin: Align the bin properly and slide it back into place until you hear a click, indicating it is securely attached.
If the message persists after reinstalling the Bin, please perform a robot reboot. If the message persists after the robot reboots, you may need a replacement Bin.
Inspecting the Bin Detect Switch
- Locate the Bin Detect Switch: The switch is usually near the bin compartment. Consult your Roomba’s manual for exact location details.
- Clean the Switch: Dust and debris can prevent the switch from functioning correctly. Use a dry cloth or compressed air to clean it.
- Check for Damage: Inspect the switch for any signs of wear or damage. If damaged, it may need to be replaced by a professional.
If your product is under warranty, please contact iRobot Customer Care.
Preventative Maintenance Tips
- Regular Cleaning: Clean the bin and filter after every few cleaning cycles to prevent the buildup of dust and debris.
- Check Connections: Ensure all components are properly connected and seated to avoid errors.
- Use Genuine Parts: Always use genuine iRobot parts for replacements to ensure compatibility and performance.










Comments